How to Choose a Card Kiosk for Automatic Issuance
A card kiosk that jams on a Tuesday afternoon at a busy registration desk costs more than the card it failed to print. It costs staff time, queue patience, and sometimes the credibility of the whole self-service program. That is why choosing a card kiosk for automatic issuance is less about picking the fastest printer and more about matching hardware, encoding, software, and service to the way your cards will actually be used.
Most buyers start with a spec sheet and a budget. That approach breaks down quickly, because two kiosks with identical print resolution can behave very differently once you add magnetic stripe encoding, contactless chips, dual-sided printing, or an AI inspection step. The variables that decide success sit outside the printer head: card material, data flow, environmental conditions, and how the machine is serviced after installation.
This guide walks through the decisions in the order a procurement team should make them — from defining the card and the workflow, through encoding and inspection, to deployment and support. It is written for operations managers, systems integrators, and facilities teams evaluating a card self-service kiosk for events, ID programs, insurance cards, or membership schemes.
Key Takeaways
- Define card type, encoding standard, and daily volume before comparing any kiosk model.
- Match the printer module to card material and thickness, not just print resolution.
- Plan the data and software layer early; encoding failures usually start there.
- Build inspection and rejection handling into the workflow, not as an afterthought.
- Confirm service access, spare parts, and remote diagnostics before signing.
Start With the Card, Not the Kiosk
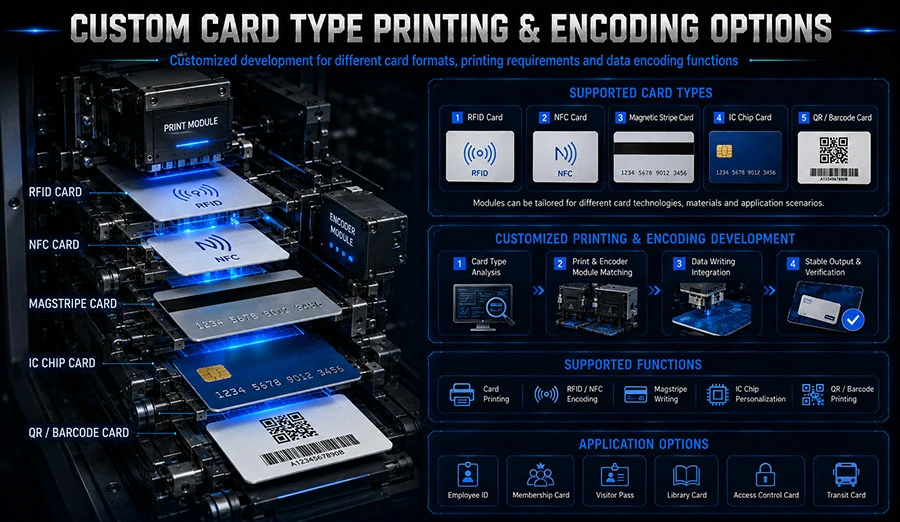
The card itself sets the technical floor for everything else. A PVC membership card printed single-sided behaves nothing like a dual-interface smart card with a contact chip, an antenna layer, and a magnetic stripe. Each added feature raises the demands on the kiosk’s encoding modules, the card transport path, and the rejection logic.
Write down four things before you look at hardware:
- Card construction — PVC, PET, or composite; single or dual-sided printing; whether a magnetic stripe, contact chip, or contactless antenna is required.
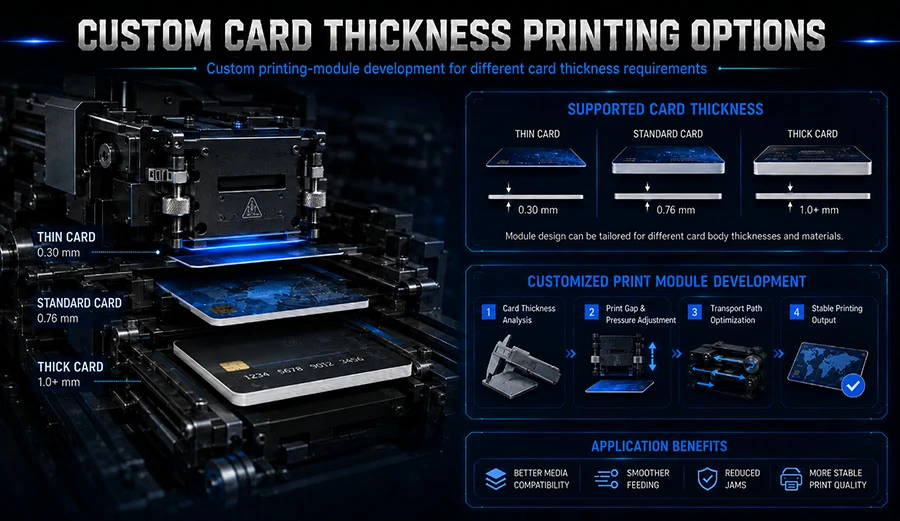
- Card thickness — most ID-1 cards sit around 0.76 mm (30 mil) per ISO/IEC 7810, but some programs use thinner or thicker stock. Confirm the exact gauge with your card supplier.
- Encoding standard — for contactless cards this is typically ISO/IEC 14443 (Type A or B) or ISO/IEC 15693; for contact chips, ISO/IEC 7816. Your card issuer or scheme will specify which applies.
- Personalization data — what gets printed, what gets encoded, and whether a photo, QR code, or barcode is part of the layout.
This is where a lot of projects quietly go wrong. A buyer orders a kiosk rated for standard PVC, then feeds it a composite card with an embedded antenna. The card may print fine but fail encoding, or the transport rollers may struggle with a slightly thicker or stiffer card. The fix is not a firmware patch; it is a different card path or a different card.
Ask your card supplier for the technical data sheet (TDS) for the exact stock you intend to use, and share it with the kiosk manufacturer before the order is placed. A TDS typically lists thickness, stiffness, surface finish, and operating temperature range — all of which affect feed reliability. If the TDS is not available, request a sample run.
Match the Printer Module to Your Volume and Environment
Print method matters more than dpi for card kiosks. Two technologies dominate: direct-to-card (DTC) dye-sublimation, which prints onto the card surface, and retransfer, which prints onto a film that is then fused to the card. Retransfer generally handles uneven surfaces and composite cards better and produces a more durable edge-to-edge image; DTC is usually faster and cheaper per card for flat PVC.
Neither is universally “better.” The right choice depends on your card mix and where the kiosk will stand.
| Factor | Direct-to-card (DTC) | Retransfer |
|---|---|---|
| Typical card type | Flat PVC | PVC, PET, composite, smart cards |
| Print durability | Good with overlaminate | High; film protects the image |
| Edge-to-edge printing | Limited on some models | Yes |
| Throughput | Generally higher | Generally lower |
| Best fit | High-volume simple badges | ID and insurance cards with chips |
Throughput figures vary by model and by how much encoding and inspection you add. A kiosk rated for a certain cards-per-hour figure in a brochure will usually run slower once you factor in chip encoding, data lookup, and print quality checks. Ask the manufacturer for a realistic cycle time that includes encoding and inspection, not just printing.
Environment is the other half of this decision. A kiosk in an air-conditioned lobby is a different machine from one in an unheated exhibition hall or a humid coastal office. Card stock and print ribbons both have operating temperature and humidity ranges on their data sheets; outside those ranges, jams and print defects rise. If your deployment site is uncontrolled, say so early — it may change the enclosure, the heating or cooling, or the recommended card stock.
Design the Data and Encoding Workflow Before Hardware
Encoding is where most automatic issuance projects fail, and it is almost never the kiosk’s fault. The kiosk is the last link in a chain that starts with your identity system, passes through a card management platform, and ends at the encoder inside the machine. If any link is misconfigured, the card comes out blank, mis-encoded, or rejected.
Map the flow in plain language first:
- Identity check — how does the kiosk know who is standing in front of it? QR code, NFC check-in, booking reference, or staff-assisted lookup.
- Data retrieval — which system holds the cardholder record, and what is the API or database connection?
- Personalization — which fields print, which encode, and in what order?
- Encoding keys — for smart cards, who supplies the keys, and how are they injected and rotated?
- Confirmation — what does the user see, and what record is written back to your system?
For event badges, the workflow is often simple: scan a QR code or tap an NFC badge, pull the attendee record, print. NP Printer Kiosk Manufacturer’s event badge kiosks are built around QR code and NFC check-in for exactly this pattern, and trade show variants add RFID badge printing. For ID and insurance programs, the flow is heavier — photo capture, dual-sided printing, chip or stripe encoding, and often an inspection step before the card is released.
Two practical rules apply to every workflow. First, test the data connection with real records, not dummy data, because real records expose missing fields and encoding mismatches. Second, decide what the kiosk does when the data is incomplete. A kiosk that prints a half-populated card is worse than one that politely asks the user to see staff.
Build In Inspection and Rejection Handling
Automatic issuance means no operator is watching each card. That makes inspection a design requirement, not a luxury. At minimum, the kiosk should verify that the card was printed, that encoding succeeded, and that the card was dispensed. Better systems add a visual check.
NP Printer Kiosk Manufacturer’s insurance card issuance kiosk includes AI card inspection, which checks the printed result before the card reaches the user. Whether or not you choose that feature, plan for three rejection scenarios:
- Print failure — the card is misprinted or smeared. The kiosk should divert it to a reject bin and retry once.
- Encoding failure — the chip or stripe did not write correctly. The kiosk should not dispense the card; it should retry and then flag for staff.
- Dispense failure — the card is printed and encoded but does not reach the user. This is the one users notice, so the kiosk needs a clear on-screen message and a staff alert.
Reject bins need to be emptied and logged. A reject bin that fills silently will eventually cause a jam that looks like a printer fault. Build a daily or shift-based check into the operating procedure, and make sure the kiosk reports reject counts to your monitoring system.
Plan Deployment, Service, and Spare Parts
A card kiosk is a piece of infrastructure. It will need cleaning, ribbon and card replenishment, firmware updates, and occasional module replacement. The procurement question is not whether it will need service, but how quickly service can reach it.
Ask the manufacturer four questions before you commit:
- What is the preventive maintenance interval, and what does it involve? Ribbon and card cleaning cycles are usually specified in the printer module’s manual; follow them or print quality drops.
- Which parts are consumables and which are spares? Ribbons, cards, and cleaning kits are consumables. Print heads, card feeders, and encoders are spares. Know the difference in your budget.
- Is remote diagnostics available? A kiosk that reports its own error codes saves a site visit.
- What is the response time, and where is the nearest support? For multi-site rollouts, this often decides the vendor.
NP Printer Kiosk Manufacturer has been in business for more than 20 years, operates 8+ branch offices, and has completed 300+ projects with 480+ trained staff — figures worth weighing when you compare response capability across vendors. For a multi-site program, ask for references from deployments similar in size and environment to yours.
Physical installation deserves its own checklist. Confirm power, network, floor space, and accessibility. A kiosk placed where wheelchair users cannot reach the card slot fails both usability and, in many jurisdictions, accessibility expectations. Test the reach height and the screen angle with real users before the site is signed off.
Pro Tips for Success
- Run a pilot with your real card stock. Send the manufacturer samples of the exact cards you will use, including any chip or antenna variants, and ask for a test report. A pilot of a few hundred cards exposes feed and encoding issues that a demo never will.
- Keep a spare printer module on site for high-traffic deployments. Swapping a module is usually faster than a repair visit, and it keeps the queue moving during peak periods.
- Write the failure script before launch. Decide what staff say and do when a kiosk is down, and put a printed fallback process at the desk. Users forgive a broken kiosk; they do not forgive being told to come back tomorrow.
- Log every reject with a reason code. After a month you will see whether failures cluster around one card type, one site, or one data field — and that is where to spend your fix budget.
Frequently Asked Questions
What is the difference between a card kiosk and a standard card printer?
A card printer is a desktop device operated by trained staff. A card kiosk integrates the printer with a screen, identity check, payment or verification module, encoding, and dispensing so the cardholder can complete issuance without an operator. The kiosk also handles rejection and logging automatically.
Can one kiosk handle both event badges and ID cards?
Sometimes, but it is rarely the best choice. Event badges are usually simple, high-volume, single-sided prints, while ID and insurance cards often need dual-sided printing, chip encoding, and inspection. Matching the kiosk to the dominant use case gives better throughput and fewer failures.
How long does it take to issue one card?
It depends on the card and the workflow. Printing alone is fast, but adding chip encoding, data lookup, and inspection typically extends the cycle. Ask the manufacturer for a cycle time measured with your card type and encoding requirements, not a brochure figure for printing only.
What card standards should I reference in the specification?
At minimum, reference ISO/IEC 7810 for the card’s physical dimensions and ISO/IEC 14443 or ISO/IEC 15693 for contactless encoding, depending on your scheme. Your card issuer will confirm which apply. Put the standard in the specification so the kiosk and card supplier work from the same baseline.
How do I handle cards that fail encoding?
The kiosk should divert failed cards to a reject bin, retry once, and then alert staff rather than dispensing. Log the failure with a reason code. Persistent encoding failures usually point to a data, key, or card-stock problem rather than a hardware fault.
Where to Go From Here
Choosing a card kiosk for automatic issuance comes down to sequencing. Define the card and its standards first, then the print method and environment, then the data and encoding flow, then inspection, and finally service and spares. Buyers who start with the printer spec and work backward usually end up retrofitting the parts that matter most.
The approach works because it treats the kiosk as one component in an issuance system rather than a standalone appliance. Cards, data, encoding, and support all have to line up, and each decision constrains the next. Get the sequence right and the hardware choice becomes straightforward.
Your next step is concrete: assemble the card TDS, the encoding standard, your daily volume, and your site conditions into a one-page brief, then send it to two or three kiosk manufacturers for a written response. Compare how each one addresses encoding, inspection, and service — not just print speed. You can review the card kiosk range at NP Printer Kiosk Manufacturer’s card self-service kiosk category and the company background on the About Us page as a starting point for that comparison.